


Tutorial- Dirt Cheap Metal Links
- Mar 3, 2016
- 3 min read
Many people end up buying pre-made link kits that may either not hold up well to abuse, or depending on the body they’re running, may not give the right wheelbase simply because they think that making your own links is too expensive or complicated. This guide aims to show that this is absolutely not the case, and that anyone can easily make links for their trucks on the cheap with just basic tools and some spare time![endif]--

Materials needed (USD):
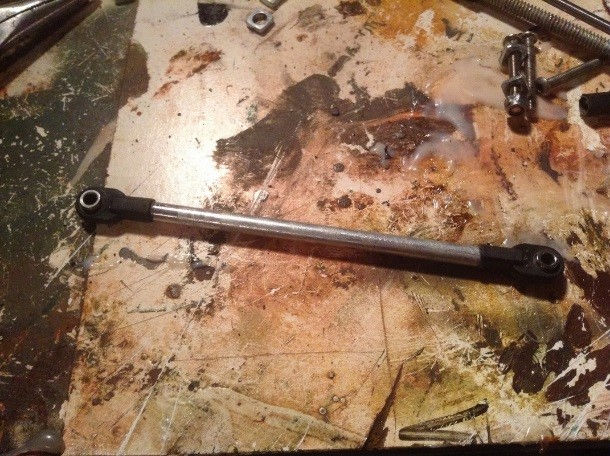
- 3/16 threaded die - $5-10 at most hardware stores
- ~3/16 solid rod of your choice - $3-6 per 3 feet
- Plastic rod ends – about $7 for 12 depending on where you buy them.
- Hacksaw or rotary tool with cutting bit
- Bench vice or wood clamps
- Electric drill
Optional: lubricating oil
The total cost for 8 links, assuming that you don’t already have a die, is about $27, or about $3.37 per link. Not including the die, they come to about $20, or 2.50 per link. Not bad at all for links that will last for a very long time!
Instructions
Step 1
Cut your rod to length. This may seem pretty intuitive – just eyeball the length and cut - , but remember that the ball-ends will stick past the end of the link itself, so don’t make them too long. However, it is advisable to cut them a little longer than your guesstimate, as you can always shorten them later, but adding more material isn’t going to happen.
Step 2
Mock up the cut link to ensure that your first measurement was correct. If it is, cut another length of rod to match (as close as possible, but some difference is OK).

Step 3
Secure your 3/16 die. If you have a vice, this is easy, but if not you can improvise by clamping it with a wood clamp tightly and clamping that clamp to your workbench with another clamp.
Chuck your first link into your drill tightly, leaving at least an inch sticking out if the link is very short.
Using the slowest setting on your drill, put the end of the rod in the die and start the drill. GO SLOW – digging a snapped piece of rod out of the die is not fun, which I’ve found out firsthand. If the link gets stuck at any point, unchuck it from the drill and spin it out of the die manually with some pliers. If you want, you can add a drop or two of lubricating oil to help keep things moving nicely. I typically stop when 2mm is sticking out of the bottom of the die, and then put the drill in reverse and slowly back the link out of the die.


Step 4
Put your rod ends on, and test fitment. You may need to drill out the rod ends if they’re designed for 2mm machine screws, but this is a simple task.
That’s it! You’re done. Just bolt them onto your truck and go find some rocks!
Tips
- always do your longer links first; if they end up being too short you can always use them for your shorter links with some tweaking, instead of having to throw them out!
- for curved links (such as steering linkages), mock them up with a straw before cutting the rod to length, and then straighten it to use as a guide; you can’t thread the rod once it’s bent, so if you guess the length you need and are wrong, you’ll have to start the link again.
- Some trial and error may be needed to get the exact wheelbase you’re looking for. You can always use longer/shorter rod-ends or unthread them a few turns to do fine adjustments if needed; no need to start the whole link over again from scratch.
![endif]--


Comments